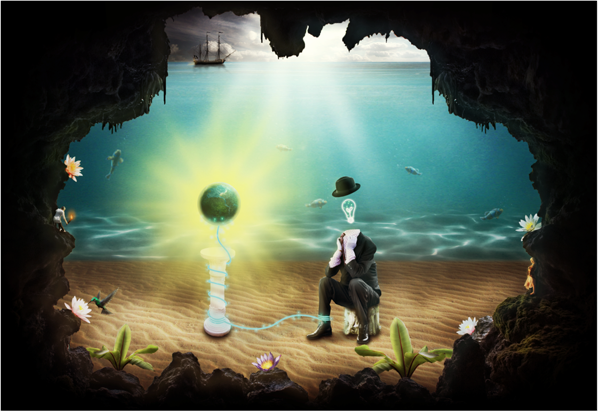
Surreal Scene with an Invisible Man Inside a Mystic

Preview of Final Results

Tutorial :

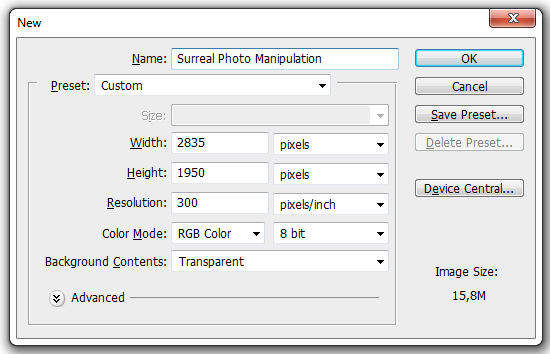
Step 1: Create a new Photoshop File

Create a new file in photoshop using these settings:
  • Width: 2835px
  • Height: 1950px
  • Resolution: 300px/inch

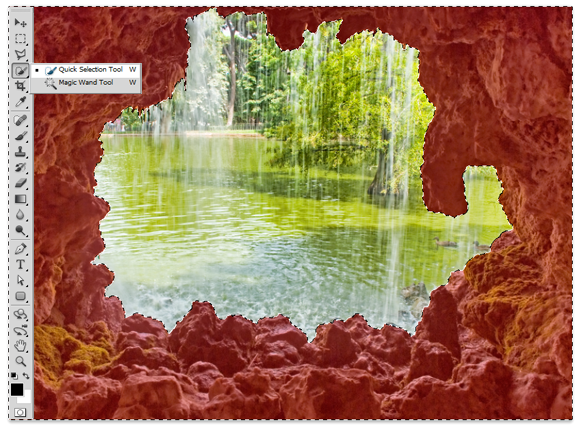
Step 2: Add the Cave

Open the cave stock and select the cave using the Quick Selection Tool (Shortcut: W). Here’s a few tips on how to make selections with the Quick Selection Tool, you’ll use them a lot throughout the tutorial:
  • Clicking anywhere in the canvas with the Quick Selection Tool will add to the selection
  • Holding Alt/Option and clicking will subtract the selection
  • You can quickly change the size of your brush holding Alt/Option, clicking anywhere in the canvas with the right mouse button, and dragging to the left to decrease the size of the brush, and to the right to increase it (you can use this technique with any tool that uses a brush)
  • To quickly use the Zoom Tool, hold the Z key, click with the left mouse button in the canvas and drag the mouse to the left to zoom out and to the right to zoom in. When you stop holding Z, you’ll return to the tool you were using before
The result of my selection is painted with red in the image below (I’ll always show my selections painted in light red).
Copy and paste the cave into our project and use the Free Transform Tool (Shortcut: Ctrl/Cmd+T) to adjust it in our project (see image below).
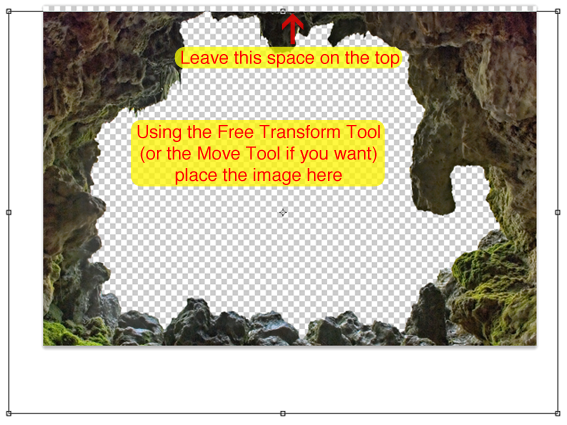
  • You can also use the Move Tool (Shortcut: V) to move the cave, but if you use the Free Transform Tool you can use the image below as reference.
Now select the Rectangular/Marquee Tool (Shortcut: M) and make a selection on the top blank space of our image (see image below for reference).

clip_image006
Press Shift+F5 to open the Fill window and select Content-Aware.
  • After you’re done with your selection, press Ctrl/Cmd+D to deselect your current selection
clip_image007
And here is the result:
clip_image008
To fix some problems with the edges, Hold Ctrl/Cmd and click in the thumbnail of the Layer 1.
clip_image009
Then go to Select > Modify > Contract and set the contract value to 5px.
clip_image010
clip_image011
Reverse the selection by pressing Ctrl/Cmd+Shift+I and then hit Delete to erase a little bit of the edges. You probably won’t be able to see the results in the image below, but If you followed the steps correctly your edges should be fixed now.
clip_image012
Now make a selection of the left side of the cave using the Quick Selection Tool (Shortcut: W), then copy (Ctrl/Cmd+C) and paste (Ctrl/Cmd+V) into our project.
clip_image013
clip_image014
With the Layer 2 selected, go to Edit > Tranform > Flip Horizontal.
clip_image015
Select the Move Tool (Shotcut: V) and move the cave part (Layer 2) to the right side of our image.
clip_image016
Now let’s erase the part of the cave we don’t want. To do that, select the Layer 1 and use the eraser (Shortcut: E) to delete the red part of the cave in the image below. Here are some notes when dealing with brushs:
  • To change the hardness of a brush, click with the right mouse button anywhere in your project and change the Hardness value
  • To change the opacity of a brush, just change the Opacity value on the toolbar at the top of your screen (it will only appear when you are using a brush)
clip_image017
Go back to the Layer 2 and erase some areas as well (see image below for reference).
clip_image018
Your result should be similar to this:
clip_image019
Select both cave layers (Hold Shift and left click on them) and merge them in one layer (Ctrl/Cmd+E). Then, double click the name of the new layer and change it to Cave.
clip_image020
Let’s fix the colors of our cave now. In the Layers pannel, click in ‘Create a new Fill or Adjustment Layer’ and select Curves.
clip_image021
Adjust the curves like this:
You can also use the Output values in the image below as reference while adjusting the curves
clip_image022
And the cave is done! It should look like this now:
clip_image023
Everytime you add an adjustment layer that you don’t want to affect all of your layers (just the first layer below it), you need to clip it to the that layer, like this:
clip_image024
Now to clean our workspace a little bit, select the Cave and the Curves layer and add them to a new group by pressing Ctrl/Cmd+G. Name the new group Cave.
clip_image025


Step 3: Add the Desert

Open the Desert stock and use the Quick Selection Tool (Shortcut: W) to select it.
clip_image026
Copy (Ctrl/Cmd+C) and paste (Ctrl/Cmd+V) the desert into our project and place its layer below the Cave group.
clip_image027
Use the Free Transform Tool (Ctrl/Cmd+T) to resize the desert without losing the proportion. Here are some tips for this tool:
  • To increase or decrease the size, click and drag one of those little squares on the edges
  • To increase or decrease the size of the image maintaining proportion, hold the Shift key while doing it
  • To see your entire selection, press Ctrl/Cmd+0 and the zoom will be adjusted automatically
clip_image028
Add a Curves adjustment layer like we did with the cave and see the image below for the input values. Like we did before, clip this adjustment to the layer below (the desert layer).
Always remember to clip an adjustment layer to the layer below it (if you don’t want it to affect any other layer)
clip_image029
Here is the result of this curves adjustment:
clip_image030
Add a Color Balance Adjustment Layer and see the image below for the input values. Remember to also clip it to the desert layer.
clip_image031
clip_image032
Your image should look like this now:
clip_image033
Select the desert layer and its adjustment layers and add them to a new group called Desert (Ctrl/Cmd +G).
  • You can also rename the desert layer (Layer 1) to Desert if you want to
clip_image034

Step 4: Add the first underwater stock

Open the Underwater stock (first one on the list), press Ctrl/Cmd+A to select the whole image and copy (Ctrl/Cmd+C) and paste it (Ctrl/Cmd+V) into our project.
clip_image035
clip_image036
Use the Free Transform Tool (Ctrl/Cmd+T) to resize and stretch the ocean. Just click and drag the squares in the edges (you don’t have to hold Shift this time) until you have something like this:
clip_image037
Now add a layer mask to this layer and start painting following the image below. Here are some tips when painting a layer mask:
  • Press B on your keyboard to select the Brush Tool
  • Press D on your keyboard to return the colors of your palette back to Black and White
  • When painting a layer mask, black will hide the layer, and white will reveal it again
  • If you make a mistake while painting a layer mask, you just have to paint the area where you made the mistake with the opposite color again (if you made a mistake while painting with white, paint with black to start over)
  • You can quickly change between your background and foreground color by pressing X
  • To hide a layer mask, hold the Shift key and click on the mask. Do the same thing if you want to reveal it again
  • To view your layer mask hold Alt/Opt and click in the layer mask. Do the same thing to return it to normal
clip_image038
clip_image039
And here is the result:
clip_image040

Step 5: Add the second underwater stock

Open the underwater stock 2, press Ctrl/Cmd+A to select it all, copy (Ctrl/Cmd+C) and paste it(Ctrl/Cmd+V) into our project.
clip_image041
clip_image042
Press Ctrl/Cmd+T to resize and stretch this new underwater stock like we did with the last one.
clip_image043
Like we did with the other underwater image, create a layer mask to this layer and paint (Shortcut to the Brush Tool: B) it following the image below.
clip_image044
Here is the result:
clip_image045
There are some stains in this stock image and we’re going to fix it now. Select the Spot Healing Brush Tool (Shortcut: J) and just start clicking the areas you want to fix.
  • Remember to select the actual image rather than the layer mask before you start
clip_image046
Here is the clean image:
clip_image047
To add the surface of the water, we’re going to go back to the second underwater stock we used and make another selection. Use the Rectangular Marquee Tool (Shortcut: M) to draw this rectangle:
clip_image048
Copy and paste it into our project. Place this layer right below the Cave group and use the Free Transform Tool (Shortcut: Ctrl/Cmd+T) to resize and stretch it.
clip_image049
Here is what your ocean should look like now:
clip_image050

Pages: 1 2 3 4 5 6

Penulis : Heldy ExoJR (admin BPP) ~ Sebuah blog yang menyediakan berbagai macam informasi

Artikel Surreal Scene with an Invisible Man Inside a Mystic ini dipublish oleh Heldy ExoJR (admin BPP) pada hari Agustus 04, 2012. Semoga artikel ini dapat bermanfaat.Terimakasih atas kunjungan Anda silahkan tinggalkan komentar.sudah ada 0 komentar: di postingan Surreal Scene with an Invisible Man Inside a Mystic
 

0 comments:

Posting Komentar